GLW-DE5 Drip expansion accessories pack
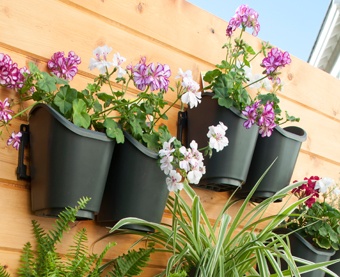
DIG’s Living Wall™ professional drip expansion accessories pack allows for an expansion of an existing Living Wall™ with five individual pots. The expansion pack uses pressure compensating drippers with a check valve to maximize efficient use of water.
Features
- The water supply is all out of sight except for the very small micro tubing that delivers water to a pressure compensating dripper positioned at each pot.
- The water line from the Living Wall™ vertical garden kit can be connected into the water supply household faucet or garden hose.
- All connections are drip irrigation standard and additional parts are available at local hardware stores or garden centers.
- Uses DIG’s pressure compensating drippers with a built-in check valve that eliminates water draining when the system is shut off, saving additional water.
How to Order
| MODEL | DESCRIPTION |
|---|---|
| GLW-DE5 | DRIPPER, DRIP STAKE, TUBING PKG - 5 EACH |
Specifications
- Drip irrigation operating pressure: 10-50 PSI (.7 to 3.4 bar)
- Required opening pressure: 4.3 PSI (.3 bar)
- Closing pressure: 2.2 PSI (.15 bar)
- Flow rates and color codes:
- .3 GPH (1.1 L/H); color code brown inlet x gray outlet
- Dripper inlet size: 1/4" barb
- Dripper outlet side: 1/8" (3 mm) barb
- The Living Wall™ modular Vertical Garden is expandable up to 65 pots using 1/4" (6 mm) micro tubing as the main line. If larger, the main line needs to be 1/2" (16 or 17 mm).
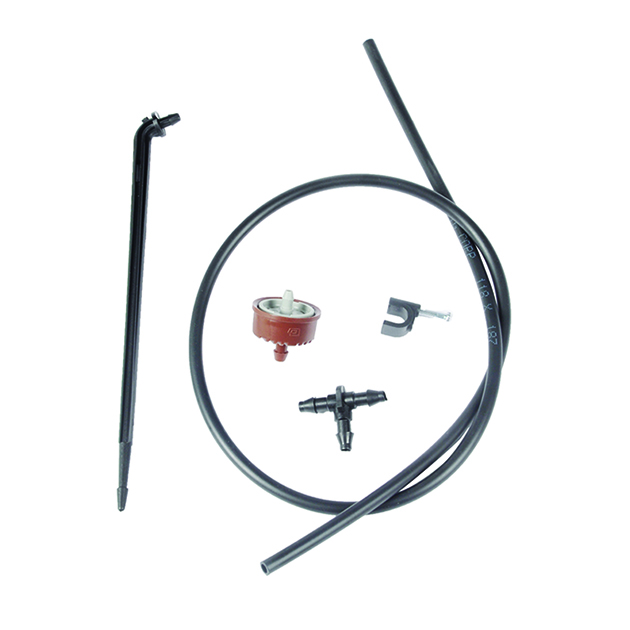
Drip accessories pack part list
| model | qty | description |
|---|---|---|
| 25-002 | 5 | 1/4" (6 mm) tees |
| PCA-003-CV | 5 | .3 GPH (1 L/H) PC-CV drippers |
| 50-187-02 | 5 | 2' (60 cm) of 1/8" (3 mm) micro tubing |
| 16-017 | 5 | Stakes with 1/8" (3 mm) barb |
| 16-006 | 5 | 1/4" (6 mm) "C" clamps |
Cut Sheets

 English
 Videos
-
DIG's Living Wall™ Modular Vertical Garden Kit Installation
If you expand the system, make sure to make a rough sketch of the layout you have before you start.
- Step 1. Begin the installation at the water source by attaching the pressure regulator to the faucet. If you decide to automate your system, first install one of DIG’s hose end timers (not included) and connect the timer to the faucet. Insert the 1/4″ (6 mm) micro tubing into the 1/4″ (6 mm) compression side of the adapter by forcing the micro tubing in and wiggling it from side to side, and then thread it into the male side of the pressure regulator.
- Step 2. Unroll the 1/4″ (6 mm) micro tubing and lay it out to the location of the Green Wall mounting pots.
- Step 3. The micro main line serves as the primary line that runs water to all the pots. At the center of each pot, cut the 1/4″ (6 mm) micro tubing and insert a 1/4″ (6 mm) tee (soaking the micro tubing in hot water will ease installation). Leave the ends of the 1/4″ (6 mm) micro tubing open, so you can flush the line before completion. Connect a short 2″ to 4″ (5 of 10 cm) piece of micro tubing to the 1/4″ (6 mm) tee.
- Step 4. Turn the water on, and flush the line for 10-20 seconds to clean out any debris inside the system.
- Step 5. Insert a .3 GPH (1.1 l/h) PC drip emitter into the end of each micro tubing. Then insert one side of the 2′ (60 cm), 1/8″ (3 mm) gray color micro tubing included with the kit into each dripper’s barbed side, and attach the stake to the end of micro tubing. Insert the stake into the pot near the crown of the plant. Repeat the steps for each pot and use the 1/4″ (6 mm) C. clamp to support the micro tubing where needed.
About the drippers in this pack
The PC drip emitters with preset flow rates discharge the same amount of water under a pressure range of 10 to 50 PSI, allowing for higher uniformity and longer lateral runs within the vertical garden planting. This feature allows the number of drip emitters on a single line to be maximized while maintaining an even flow rate from each PC drip emitter along the line.
The drippers included in the kit contain a silicon diaphragm that continuously adjusts to varying water pressures and at the same time allows particles to pass through the drip emitter’s water passage, providing reliable performance and a longer life. This method of flushing with a large flow path allows the drip emitters to operate at optimal flow rates under extreme conditions. In addition, the drippers have a special water saving feature that eliminates water draining when the system is shut off at around 2.2 PSI (.15 bar). At this pressure, the pressure compensating drip emitters shut off completely, preventing any water drainage from the lateral. When the system is turned on again the drippers simultaneously reopen at 4.3 to 4.5 PSI (.3 to .31 bar) for precise control of water flow over the length of the lateral.
Drip irrigation installation suggestions
- If an automated system is preferred, install one of DIG’s hose end timers.
- Test the hose end timer and make sure that is working correctly.
- The system can start also from an 1/2″ sprinkler riser. Remove the sprinkler and install the 1/2″ adapter with a 1/4″ (6 mm) outlet barb.