Drip Soaker Tape
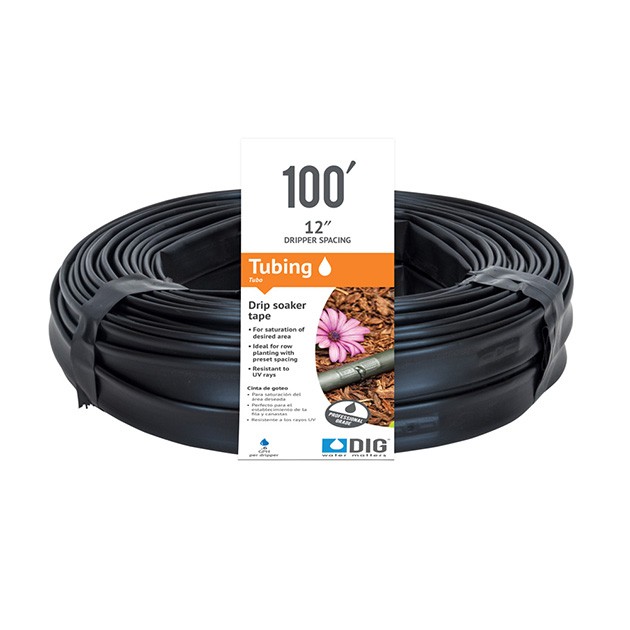
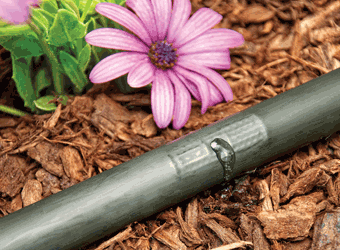
Drip Soaker Tape is a flat, thin-walled hose containing pre-spaced drip emitters, that expands when filled with water. The model ST100R for 100’ and ST500 for 500’ drip soaker tape have in-line drip emitters, welded into to the drip soaker tape every 12” during the extrusion process, allowing for complete saturation coverage along the line. Ideal for drip irrigation of vegetable gardens and row crops including tomatoes, strawberries, melons, peppers, eggplants and more, drip tape can be installed above or below ground or under mulch. The most efficient use of drip soaker tape is with low flow drip emitters, closely spaced to achieve the desired wetting pattern. Homeowners are successfully using a range of drip irrigation techniques including drip soaker tape systems to grow a variety of crops without the use of traditional sprinkler systems. The drip soaker tape requires special fittings, available in a number of configurations, for exclusive use with the drip soaker tape.
Features
- Ideal for use on rows of vegetables or fruits, such as blueberries, strawberries, cucumbers, melons, raspberries and many more
- High-quality-extruded thin walled pipe profile with pre-inserted drip emitters every 12”
- Simple to install
- Can operate under extreme weather and field conditions
- Unmatched uniformity, performance and reliability for a wide range of crops
- Requires less than half of the water needed for sprinkler irrigation
- Resistant to chemicals and fertilizers commonly used in landscaping
- Install above or below ground
- Using drip tape, high levels of water management can be achieved because plants are supplied with precise amounts of water
How to Order
| MODEL | DESCRIPTION |
|---|---|
| ST100R | 100 ft. Coil of Drip Soaker Tape with drippers every 12 in. |
| ST500 | 500 ft. Coil of Drip Soaker Tape with drippers every 12 in. |
Specifications
- Operating pressure range: 10 to 25 PSI
- Recommended operating pressure: 10 to 25 PSI (use with model D46 25-PSI pressure regulator)
- Flow rate: .6 GPH @ 15 PSI and .8 GPH @ 25 PSI
- Total flow rate for 100’ coil: 60 GPH (1 GPM) per 100’ @ 15 PSI and 80 GPH (1.2 GPM) per 100' @ 25 PSI
- Drip emitter spacing: every 12"
- Drip tape length: 100’ (model ST100R) and 500’ (Model ST500)
- Drip tape size: 15 mil with .634 ID x .665 OD
- Maximum recommended run: up to 280’ @ 25 PSI
- Color: black
- Filter requirement: minimum of 150 mesh
- Material:
- Drip tape & drip emitters: linear low-density polyethylene
About
Drip Soaker Tape is a drip irrigation method for watering vegetable gardens, row crops and flowerbeds, or where total saturation is desired along a straight, narrow path of the drip tape. The drip soaker tape is a flat drip tape with .8 GPH @ 25 PSI labyrinth-like flow path drip emitters welded into the inside diameter of the tape every 12”. When filled with water, the drip tape expands and disperses the water through the pre-inserted drip emitters. Operating pressure for this product is 10 to 25 PSI. We highly recommend installing a 25 PSI preset pressure regulator and a filter at the beginning of the line. The drip soaker tape can be used below or above the ground and can be covered by mulch. The drip tape can be installed in a sub-surface layout 4” to 8” deep, depending on the crop and soil type.
To use drip irrigation in vegetable gardens, it is best to water early in the morning before the temperature begins to rise, allowing excess moisture on leaves and top soil to dry before fungal and other diseases can develop. The most common cause of early plant death is over watering. Using drip irrigation can help sustain healthy plants by applying water directly to the plant root zone when and where it is needed.
The drip soaker tape requires special drip soaker tape fittings that are different in design from those used with 1/2” drip tubing, in that they work with a twisting lock device rather than with compression. See link to our drip tape fitting: https://www.digcorp.com/product-residential/drip-soaker-tape-fittings/
DIG provides the following installation steps as general suggestions. There are other ways to install this product.
When designing a drip irrigation system using drip tape, first identify the number of similar irrigation zones needed. Irrigation zones can be based on factors such as type of vegetable crop, total flow available in a given time (see drip tape flow rate), field length and soil texture. Once the zones are designed and the drip system is selected, an irrigation schedule must be set up to meet the unique needs of the crop in each zone. A properly designed and installed drip system will provide better uniformity for many years and can improve crop production.
Start the installation from a PVC pipe or to pipe thread
- If the drip system installation is started from a PVC pipe, first shut off the main water supply.
- If an automated system is preferred, we recommend installing a 3/4” ball valve or gate valve before the battery operated controller or AC valve, if used. This ball valve can be very useful as an emergency backup to turn the system off. This type of arrangement is used by professional installers.
- Turn the water supply on to flush the line and then shut the water supply off using the new ball or gate valve.
- Install an AC valve or battery operated controller, wrapping TEFLON tape on all the male thread fittings used.
- Turn the water supply on again to pressurize the system. The unit will open momentarily and then will shut off.
- Test the valve or the battery operated controller and make sure that valve or battery operated controller are working correctly. If using a battery operated controller, program the controller.
- After the AC valve or battery operated controller, add a 3/4” screen filter with 155-mesh (model D55). The screen filter is used to protect the drip system. Next, add a preset 25 PSI pressure regulator (model D46P) or adjustable pressure regulator (model PRV075). The pressure regulator is used to lower the pressure to the normal operating pressure for a drip system. Follow with a 3/4” swivel adapter (model 50001) to the drip tubing or 3/4” PVC thread x slip adapter to the PVC line.
Start the installation from a faucet or hose thread
- If an automated system is preferred, install a hose end timer.
- Test the hose end timer and make sure that it is working correctly, then program the timer. To the hose end timer, add a backflow device (model D45), then a 25 PSI pressure regulator (model D46), and then a 3/4″ swivel adapter with screen (model C34). If water quality is a concern, we highly recommend using DIG’s fine mesh 3/4″ filter with 155-mesh (model D57A). To connect the 1/2″ drip tubing into the compression fittings side, cut the drip tubing with a hand pruner, being careful to keep dirt from entering the line, or connect the fitting to the end of the 1/2” drip tubing. To do so, hold the fitting in one hand and the 1/2” drip tubing in the other and force the drip tubing into the fitting by wiggling it from side to side. Make sure that the drip tubing is pushed into the compression fitting side for about 1/2″ to 5/8″ for a very tight fit. No glue or clamps are required.
- At this stage of the installation you have two layout options:
Option one with single row:
Use the drip tape to 1/2” drip tubing connector (model ST15) to connect the drip tape to the end of the drip tubing for a single line of drip tape. This one line can be extended up to 280’ long using the drip soaker tape connector. First, connect the 1/2” drip tubing to the compression side of the connector by pushing and wiggling the 1/2” drip tubing into the adapter end. Connect the drip soaker tape to the other end by first turning the ring counter-clockwise to expose the barb, then pushing the drip soaker tape over the barb, and finally threading the sleeve clockwise to lock in place.
b. Lay out the 100’ drip soaker tape (model ST100R) near the vegetables row or between two close rows (6”-10” apart). Extend the drip tape a few extra feet past the end of the row.
Option two with multi-rows:
Additional 1/2” drip tubing may be added to the 5’ section in this kit and used as the main line. Lay out the 1/2” drip tubing perpendicular to the vegetable garden rows. Near each row, punch a hole in the 1/2” drip tubing using a tool punch (model D44) and insert the barbed end of the drip soaker tape reducer (model ST13B-pack of two) into the 1/2” poly tubing. Connect the drip soaker tape to the other end by first turning the ring counter-clockwise to expose the barb, then pushing the drip soaker tape over the barb, and finally threading the sleeve clockwise to lock in place. Lay out the 100’ drip tape near each vegetable row or between two close rows (6”-10” apart). Extend the drip tape a few extra feet past the row.
- Turn the water on and flush all outlets for about 30 seconds to a minute and after the lines are flushed, turn the water off.
- Close each drip soaker tape end using the end closer (model ST12B).
- Turn the water on again to test the system and check for leaks.
- If a hose end timer is used, program the timer.
NOTE: Install the drip soaker tape in straight lines only.
A report from Cal Poly San Luis Obispo’s Research Center (ITRC) reveals that closely spaced drip emitters can improve salinity, provide a better wetted pattern and increase crop quality.